Tag: Fun Science Activity (Page 2 of 10)

Weekend Science Fun: Photography for Kids

With digital equipment and all the great editing software, photography is so much more accessible to children these days. But wait, isn’t photography all about art. How can you use it for science?

1. Life Cycles

Your children can use a camera to record all sort of life cycles. We’ve done silkworms, queen butterflies, frogs, etc. How about capturing a scene as it changes from week to week, or the growth of a flower?

2. Weather

Use a camera to record the weather. Our local newspaper has added a feature where they print local weather photographs taken by amateurs in the area. I personally love to take photos of clouds. Your children will have many imaginative ways to record the weather, I bet.
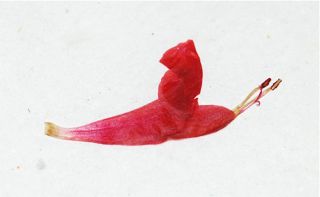
3. Identification

Challenge your children to record 20 different kinds of trees with their camera. Or 50 different kinds of plants. Basically you can make collections useful for identification, just with photographs instead of actual specimens.

scorpionweed

That’s how I’m trying to learn local wildflowers.

4. Record your child’s own growth by having them take photos of themselves in the same place on a monthly basis. (Taking a self-portrait requires a good working knowledge of a camera.)

5. Learn how a camera works.

How did the first cameras work? What does focal length mean?

Edit: As the link is broken, here is a video that shows some of the basics of how a camera works.

6. Actually build a digital camera.

Students Can Build Digital Camera (This is a news website with ads).

Absolutely awesome websites for many, many more ideas:

Using Digital Photography in the Science Classroom

Photography for Kids at A to Z

Homeschool Photography for Kids

If you want even more information, try one of these photography books:

See the financial disclosure page for information about my affiliation with Amazon.

Weekend Science Fun: Mother’s Day Science Projects

Pssst, Kids:  Mother’s Day is coming up soon. Are you looking for science and art projects that will be nice Mother’s Day presents? Here are a few ideas. I would love to hear yours.

1.    Decorate a pot and plant a flower, houseplant or herb for your mother to enjoy.
Gather:

  • Clay pot of appropriate size
  • Potting soil and water
  • Pot paint (preferred) or acrylic craft paint, acrylic paint markers (optional).
  • Plant or seeds

Decorate the pot by painting it and let it dry. The acrylic paint dries fairly quickly so you can make designs. Use acrylic paint markers to add words such as “Happy Mother’s Day.”

flower pot

Cover the hole in the bottom of the pot with a small stone and fill pot about half way with potting soil, if you are using a plant purchased from a nursery. Add your plant and fill remaining soil around it. If you started some cuttings from the plant propagation activity, they would look great in a pot, too.

If you want, you can also start with seeds. Fill the pot with potting soil and plant the seeds according to the instructions on the package. Here are some chives and basil plants just starting.

seedlings
Remember to keep your plants watered while you are waiting for that special day.

2.    Dye some white flowers her favorite color.
Gather:

  • Vases – one for each color you are going to test
  • Water
  • White flowers such as carnations
  • Food coloring

Place the white flowers in vases of water. If an adult is helping you, ask him or her to cut the stem at an angle, preferable under water, so the flowers can take up water easily. Add at least 20 drops of food coloring to each vase, a different color in each one. If you have enough vases and flowers, leave one without food coloring to use as a control. Watch and see what happens for about a day. Compare whether all the colors worked the same. Place all the flowers together in a pretty vase of fresh water and present to your mother.

3.    Make a picture or card of pressed flowers.
Did you press any flowers with a plant press from the activity about weeds? Use the flowers to make a nice flower bouquet that your mother can enjoy for a long time.

There are several ways to use pressed flowers. The easiest is to glue the flowers to a piece of paper with white glue. Use a small paint brush and/or tweezers to help move the delicate dried plants. If you have some, special paper glue used in paper arts works best.

dried flower
Doesn’t this dried flower look a bit like a hummingbird?
You can also use contact and wax paper, as suggested at About.com.

4.    Draw a picture of her favorite flower and/or animal.
Use markers or crayons to draw a picture for your mom. If you want to try something new, try using watercolor markers to draw small circles for the body and head of animals and then add details with a black sharpie.

picture

Mix pressed plants and drawings for a neat effect.

5.    Make a card using the paper you made in the recycled paper activity.

6. Write your mom a poem. Mothers love poems!

For inspiration fold an origami animal, like the butterfly at the bottom of this post, and then write your poem on it.

These are just a few suggestions. If you have more, please let us know.

Weekend Science Fun: Tree Leaf Age

This week’s topic is, well, timely.

A few years ago my son asked how long tree leaves live. Having grown up in an area with four seasons, I always thought leaves lived from spring to autumn, when they fell off. Here in Arizona, however, we have trees that are green year around and I had no idea how long the leaves of a lemon tree, for example, might live. Then I began to wonder if trees and shrubs grow new leaves throughout the spring and summer, or whether they have short burst where all the leaves come out and that’s it.

If you’d like to find out how long the leaves live on your trees or shrubs, choose some freshly emerged leaves and mark them with acrylic marker. You can tell the young leaves because they are a lighter, brighter green color and are toward the tip of the branch.

If you don’t have a marker, you could also mark the leaves with tags or ties, anything that won’t wear or fall off or interfere with normal leaf development and photosynthesis. Record how many leaves you tag, when you tag them, and roughly where they are in the tree.

Check your leaves periodically. You might want to mark more leaves each time if you see new ones. This is a long-term project, so be patient.

We marked some of the new leaves on our lemon tree a few years ago. Our marked leaves remained on the tree through one entire year. The tree dropped a lot of leaves a couple of times, but our marked ones held on. Unfortunately, our marked leaves were lost before the experiment was finished when someone — who didn’t know about our experiment — trimmed the tree. We are going to try again this year.

Let us know what kind of tree or shrub you choose and how long the leaves last. Let me know if you think we should do a contest for the oldest leaf.

How long do you think the oldest leaf would be?

lemon tree

« Older posts Newer posts »