Tag: germination test

Plant Science: Germination of Seeds

Plant-Science-Lessons

Today we are going back to visit the book Seed to Seed: The Secret Life of Plants by Nicholas Harberd for more insights.

(Image is affiliate link)

The author, Nicholas Harberd, has run into a bit of a roadblock in his research. When he asks his son what he is doing at school, his son tells him he is growing beans in a jam jar, a classic elementary school activity. There’s an “Eureka!” moment as Dr. Harberd realizes the importance of these early experiences.

Sprouting bean seeds in preschool or kindergarten is a seemingly universal activity.  Just because it is very common, however, does not mean it has less value. Germinating bean seeds is a significant early introduction to how plants work.

Seed Germination

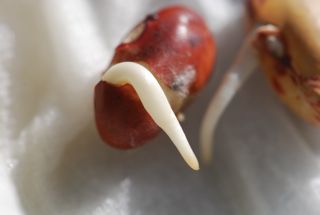
As you can see from this time lapse video of a mung bean germinating, the process unfolds in a defined sequence.

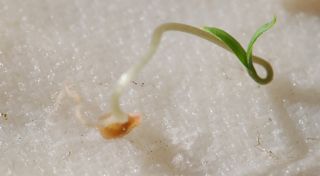
First, the seed coat begins to wrinkle and the seed swells as water is taken up. If you keep an eye on the center bean, you can see the tiny white radicle begin to emerge first. If you look closely at about 1:00 minute, you will see the end of the radicle, which is still white, starts to produce fine threads. Those are root hairs. At the same time, the part closer to the seed is also elongating and beginning to green up a bit. That is the hypocotyl, which is what supports the cotyledons as they rise about the surface. As the hypocotyl continues to elongate, the cotyledons begin to emerge from the seed coat. By 2:00 minutes, the cotyledons are beginning to open and the first leaves or plumules are beginning to show. The stem-like structure that will eventually arise between the cotyledons and the plumules is called the epicotyl.

Brittannica Kids has a good graphic showing the bean germination process.

Activity 1. Sprouting Bean Seeds (Observing and Experimenting)

This activity can be done any number of ways. I will give instructions for one way and links to other sites with good instructions.

Gather:

  • Dry bean seeds, especially big types like lima beans, available in the grocery store in the dried food area. Dry bean soup mix is another fun source of different types of beans, and some contain barley or other grains.
  • Paper towels
  • Water
  • Plastic sandwich bag or paper plate covered with plastic wrap
Bean Soup Mix

Bean soup mix is fun to sprout.

Procedure:

Wash hands before starting to cut down the chances of mold.
1. Wet two or three paper towels until damp, not dripping wet. Lay the towels flat.

2. Place enough beans for all the children on half of the towel. Fold the top over, creating a sandwich with the beans inside.

3. Slip the paper towels into a plastic bag and close, or onto a paper plate and cover with plastic wrap. The plastic will help prevent the towels from drying out too quickly.

4. Check the beans every day to see how the beans germinate. Depending on the temperature, the beans should start to swell and a root start to form as early as 24 to 48 hours later.

Add enough water to keep them damp if the towels begin to dry out.

bean-soup-mix-sprouting5. Have the children draw the beans each day and measure how much each part has grown, if possible. Record the results.

6. Allow the children to experiment with the seeds. They might want to remove portions of the plant or seed or change the growing conditions (moisture, light, add soil) to see what happens.

Extension: Compare seeds with two cotyledons with seeds from plants like barley, corn or wheat, which have only one. See What is a Seed for dissection instructions.

Related links (some sites have ads):

Activity 2: Germination Test for Older Kids

Ever have a pile of leftover seed packets tucked away in a cupboard somewhere? You know, the ones with the “Packed for 2009” stamped on them?

seed-packets


If you are not sure whether the seed is still viable or whether planting it would be a waste of time, there’s an easy test to find out. It is called a germination test.

Pull out your old seed packets. Note: check the packages carefully to see if the seeds are treated with pesticides, such as fungicides or insecticides. Avoid handling pesticide-treated seeds.

For each packet you and/or your children want to test, gather the following:

  • Paper towels
  • Either paper plates and plastic wrap /or zip-loc style plastic bags
  • Water

Wash your hands prior to starting and try to keep everything as clean as possible.

1. Prepare a separate damp paper towel for each different seed packet.

2. Select 10 seeds from each packet you want to test. For example, you might have 10 marigold seeds and 10 corn seeds.

3. Lay the 10 marigold seeds on a damp paper towel and fold it over. Then either lay the towel on a paper plate and cover with plastic wrap, or slip the damp paper towel into a zip-loc bag. Repeat for the 10 corn seeds or whatever kinds of seeds are in the rest of the packets.

germination test

3. Come back in 24 hours and 48 hours and look for the tiny root (radicle) poking out of the seed, a sign that it is germinating.  Count how many seeds germinate and how many do not. Certain seeds, like carrots, take a long time to germinate (up to 2 weeks), so keep them moist and don’t give up on them right away. If no seeds germinate after two weeks, then perhaps it is time to invest in a new batch of seeds.

You can calculate the percent germination by dividing the number that germinated by the number you set up. For example if 9 seeds germinated out of 10, then your percent germination = 90%. If only 5 germinated out of 10, then the percent germination is 50%.


Do you have any questions or seed germination activities to suggest? Feel free to leave us a comment.
leaf-border

To see our complete plant science lessons, either visit the plant science category (newest posts to oldest posts) or the plant science section of our experiment archive page (links to posts in order).

For more activities, try our Gardening/Plant Science for Kids Pinterest board.

Weekend Science Fun: Germination Science Experiments

Did you try the germination tests from last week? Did you get anything that looks like this?

bean radicle

If you enjoyed sprouting seeds, then here are a few more ideas for seed germination science experiments.

Before starting, however, let’s take a minute and think about how information from experiments on seeds and germination might be important. Last week we discussed how you could use a germination test to see if old seed you have lying around is still viable (able to make new plants). Plant scientists interested in maintaining rare plants, entrusted with ensuring maximum yields from crop plants and/or concerned with storing seeds in seed banks for the future study the changes in seeds over time and how to slow or prevent loss of viability. These scientists subject seeds to different conditions and examine the physical and chemical changes that occur as time passes. Their findings indicate that factors such as temperature, moisture, diseases, and chemical pollutants can all change seed viability.

Experiment 1. Effect of temperature on seeds and seed germination

Think of ways to test whether temperature effects seed sprouting or percent germination.

Example A:
Choose seeds of one kind of plant to test. (Note: Be sure to check the seed package carefully. Some seeds are treated with pesticides). Randomly assign the seeds to three categories. With the help of an adult, place 1/3 of the seeds on a paper towel or on a microwave safe plate and heat in a microwave on high for thirty seconds. Allow seeds, especially oily ones, to cool before touching them.  Add 1/3 of the seeds in a freezer overnight in a freezer. Leave the remaining seeds at room temperature. Then perform a germination test as described last week. Count the number of seeds that germinated for each treatment and divide by the total of seeds (for that treatment) to obtain the percent germinated. If there are no differences, how can you modify this test?

Example B:
Choose seeds of one kind of plant and divide into three groups. Prepare each group for germination as discussed last week. Place one group in the fridge, one at room temperature and one in a sunny window or other place warmer than room temperature. Make sure they all stay moist but not too wet. Record the number of days until germination and also the percent germination (see Example B.)

Experiment 2. Rate of germination of seeds from different plants
Collect seeds from different plants (two examples of plants with vastly different germination times are radishes and carrots.) Perform the germination test as described last week.

Note:  because radishes and carrots have different germination times, it is possible to plant them together in a garden. The radishes will come up and mature first. The slower carrots will benefit from the extra room left behind as the radishes are pulled out and used.

Experiment 3. Effect of chemicals or pollutants on seed germination

Use your imagination to come up with treatments that may increase or decrease germination. Think about things like salts (may be present in the water or soil), nutrients, and/or antimicrobial treatments that might change how many seeds of a given batch germinate.

As always, we would love to hear your ideas and/or results.

tomato seed sprouting

For further study:
Seeds and Plants (Science Workbook) by Diane O’Hanesian, John Jones (Illustrator)
Grades 2-3

This book does a good job with terminology and also showing concrete, real world examples. Better done than many science books for the younger set.


The Magic School Bus Plants Seeds: A Book About How Living Things Grow by Joanna Cole (Author), John Speirs (Illustrator), Bruce Degan (Illustrator)


For many more suggestions, visit our list of children’s books about seeds at Science Books for Kids.

childrens-books-about-seeds

And a treat for adults interested in science and plants:
Seed to Seed: The Secret Life of Plants by Nicholas Harberd


Disclosures: I am an affiliate for Amazon. If you click through the linked titles or ads and make a purchase, I will receive a small commission at no extra charge to you. Proceeds will be used to maintain this self-hosted blog.

Weekend Science Fun: Germination test

Last week we looked at planning a children’s garden. Now are you ready to do some gardening-related science activities? The germination test project this week is both useful and educational.

Ever have a pile of leftover seed packets tucked away in a cupboard somewhere? You know, the ones with the “Packed for 2001” stamped on them?

seeds packets

If you are not sure whether the seed is still viable or whether planting it would be a waste of time, there’s an easy test to find out. It’s called a germination test.

Pull out your old seed packets. Note: check the packages carefully to see if the seeds are treated with pesticides, such as fungicides or insecticides. Avoid handling pesticide-treated seeds.

For each packet you and/or your children want to test, gather the following:

  • Paper towels
  • Either paper plates and plastic wrap /or zip-loc style plastic bags
  • Water

Wash your hands prior to starting and try to keep everything as clean as possible.

1. Prepare a separate damp paper towel for each different seed packet.

2. Select 10 seeds from each packet you want to test. For example, you might have 10 marigold seeds and 10 corn seeds.

3. Lay the 10 marigold seeds on a damp paper towel and fold it over. Then either lay the towel on a paper plate and cover with plastic wrap, or slip the damp paper towel into a zip-loc bag. Repeat for the 10 corn seeds or whatever kinds of seeds are in the rest of the packets.

germination test

3. Come back in 24 hours and 48 hours and look for the tiny root (radicle) poking out of the seed, a sign that it is germinating.  Count how many seeds germinate and how many do not. Certain seeds, like carrots, take a long time to germinate (up to 2 weeks), so keep them moist and don’t give up on them right away. If no seeds germinate after two weeks, then perhaps it is time to invest in a new batch of seeds.

You can calculate the percent germination by dividing the number that germinated by the number you set up. For example if 9 seeds germinated out of 10, then your percent germination = 90%. If only 5 germinated out of 10, then the percent germination is 50%.

If the seeds germinate, transfer the tiny sprouts to containers filled with moist soil and you’ll have transplants ready when it is time to start your garden.

Tie-in books for the youngest set (Affiliate cover links go to Amazon):

A Seed Is Sleepy by Dianna Hutts Aston and illustrated by Sylvia Long

How a Seed Grows (Let’s-Read-and-Find-Out Science 1) by Helene J. Jordan (Author), Loretta Krupinski (Illustrator)

From Seed to Plant by Gail Gibbons

Gail Gibbons has definitely been one of our favorite nonfiction authors and this book does not disappoint.

And books for adults:
Seed to Seed: Seed Saving and Growing Techniques for Vegetable Gardeners by Suzanne Ashworth Kent Whealy