Today we are joining with Share It! Science News blog in a kid-friendly investigation of composting. Here at Growing With Science we have activities to explore decomposition and the organisms found in compost. Share It! Science News is delving deep into composting with earthworms (vermicomposting). Be sure to go over and see what earthworm eggs look like.

Spring is a perfect time to add last year’s compost to the garden and start this year’s compost heap. While you are at it, why not incorporate some science activities for children?
Activity 1. Exploring Decomposition
Decomposition is an incredibly important process. Things rotting and decaying may not be pretty, but imagine what the world would be like without decomposition. Dead organisms would pile up and the nutrients tied up in them would not be released to be used again.
Test to see whether the addition of soil speeds up decomposition.
Note:Â The observation portion of this experiment will take two to four weeks depending on materials used, temperature, and humidity. Also, set up outdoors or in a well-ventilated area and warn children not to disturb, inhale, or eat decaying materials.
Gather:
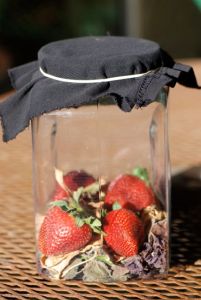
- Clear containers, gallon-sized or bigger, if possible
- Squares of fabric to cover container
- Rubber bands to hold cloth covers in place
- Plant debris, like leaves, grass clippings
- Fruit and vegetable scraps, grains (no meat)
- Soil, potting mix, or finished compost
- Cup to measure soil and water
- Water source
- Optional:Â man-made materials (to check if they are biodegradable)
- Optional:Â thermometer
Prepare two containers with identical mixes of plant material and the same amount of water (enough to make damp).
Add a cup of soil, potting mix, or finished compost to one container.
 Observe the two containers daily and record which one seems to contain materials that are decomposing more quickly. If there is a thermometer available, record the temperature of the mix each day. Add water as needed (same amount to both containers). Compare and discuss your results when completed.
Note:Â Too much water will cause anaerobic conditions or lack of oxygen. The microorganisms that grow under anaerobic conditions tend to smell really bad. If that happens and you want to try to save the experiment, pour off the excess water and stir in some dry leaves or grass clippings (same amount in each container).
Extension 1:Â Prepare more containers to compare the effect of adding soil versus potting soil and/or finished compost.
Extension 2:Â Add various man-made materials to test to see if they are biodegradable. Examples might be different types of packing peanuts, pieces of Styrofoam, pieces of plastic bags, cardboard, or different types of paper.
Activity 2. Discovering Critters in the Compost
A compost pile is a community of living things that are dependent on each other. Microorganisms such as bacteria, yeasts and molds are at the forefront of the decomposition process. Helping them (or eating them) are the invertebrates. The invertebrates help the microorganisms by tearing up or breaking up the larger pieces of plant material and by moving microorganisms about on their bodies. Remember that a compost pile that is working optimally will be too hot to harbor much besides microorganisms.
 (Photograph of compost bin in public domain at Wikipedia)
Look through a sample of compost to see what critters are found hiding there.
Gather:
- Magnifying lens
- Dissecting microscope, if available
- Petri or specimen dish to hold sample
- Tweezers, forceps or a small stick to poke through compost
- Small paintbrush to remove debris and move tiny creatures
- Paper and pencil to make drawings and record results
- Gloves (optional)
- Identification guides, or take a look at descriptions of compost critters
What invertebrates should you expect? (Links go to related Growing With Science posts)
Insects
beetles, crickets, cockroaches, ants, flies like fruit flies, silverfish, or earwigs
 Crickets, cockroaches, some flies, and some beetles feed on the plant materials added to compost. The ants, riparian earwigs and most beetles will be feeding on other creatures living in the compost pile or bin.
Snails, slugs
 Slugs and snails may feed on leaves of plants added to a compost pile and help break up large pieces.
Arachnids
Spiders
 Mites
Mites
 Pseudoscorpions
All the arachnids feed on other animals (are predators).
Millipedes, centipedes

Millipedes feed on decaying plant materials. Centipedes are predators of other animals.
Earthworms

Earthworms help make big pieces of plant materials smaller. See Share It! Science News for how to compost with worms.
Sowbugs, Pillbugs

Sowbugs and pillbugs also feed on decaying plants.
Nematodes (round worms)
Nematodes are by far the most abundant invertebrate found in compost heaps. They are tiny hairlike worms usually visible only under the microscope. It has been estimated that a single rotting apple may contain as many as 90,000 nematodes!
Related:
- See our post with composting activities to accompany the Rotten Pumpkin Book
- Our post about decomposing tree leaves
- Compost Stew Book Author Website has loads of links to compost lessons, games, information, etc.
- Compost Stew lesson plan from Books in Bloom (download here)
- Resource for older children:Â food web of the compost pile illustration (download here)
Try our growing list of children’s books about decomposition and compost at Science Books for Kids.

Follow Roberta’s board Compost Science for Kids on Pinterest.


