Category: Physics (Page 2 of 7)

Building It for STEM Friday

Today Growing with Science is hosting STEM Friday, the meme that highlights Science, Technology, Engineering and Math books for children (as well as older favorites). The STEM Friday book meme can found each week at the  STEM Friday blog. It is a great resource if you are looking for the newest and best in STEM books for kids.
_____________________________________________________________________

You know how much we love hands-on activities here at Growing With Science, which is why we were excited to find Build It: Invent New Structures and Contraptions (Invent It)by Tammy Enz.


(Affiliate Link)

Author Enz is a civil engineer, and her experience shows in the details in each of the projects. Included are instructions on how to make a device that can open an close a door remotely (with strings), a newspaper fort, a trash grabber, toothpick bridge, a pet waterer and many more. Each project comes with a list of materials and step-by-step instructions with color photographs accompanying each step.

In additions to the projects, sidebars are sprinkled throughout that reveal some historically-important inventions. Did you know the can opener was invented 48 years after the invention of the tin can? Amazing!

Build It: Invent New Structures and Contraptions would be great for a busy teacher looking for a quick science or engineering project because it has complete and detailed plans. It would also be fun for the home inventor who could build the project as presented and then use the skills he or she learned to tweak the design or come with up with a whole new invention.

Related activity:

The book contains plans for a toothpick bridge held together with hot glue. If you want to work with younger children who aren’t ready for a hot glue gun, however, try the classic toothpicks and mini-marshmallows. The children can build bridges or towers. Hint: Fresh marshmallows can be mushy. Allow the marshmallows dry out for several days to stabilize the structure before testing or moving it.

This quick video shows some of the details.


Other materials that can be used for building bridges or towers include plastic drinking straws, craft sticks, and dried spaghetti.

Even grapes can work in a pinch, although the structure won’t be a permanent one.

These projects are sure to lead to bigger things!

More about bridges (scroll to bottom for additional links)

Build It: Invent New Structures and Contraptions by Tammy Enz

Reading level:  3-4
Paperback: 32 pages
Publisher: Capstone Press (January 1, 2012)
Language: English
ISBN-10: 1429679816
ISBN-13: 978-1429679817

Book was provided by publisher for review purposes.

Weekend Science Fun: Attracted to Magnets

We have been attracted to magnets lately.

Studying magnets and magnetism appeals to a wide range of age groups. Youngsters can start out exploring their environment with magnets; older children can investigate compasses and how motors work. High school students might research the Earth’s magnetic field or how animals use internal magnetic compasses to navigate.

Where do you find magnets?

Often you can find magnets around the house, such as refrigerator magnets, magnetic letters, and even in wooden toy train sets. Toy stores sell magnetic building kits. Educational supply stores carry stand alone horseshoe magnets. Office supply stores sell magnets in different shapes, often brightly colored. It is relatively easy to find inexpensive ones.

Neodymium or not?

Neodymium are small, extra-powerful magnets. Because they are so small and so powerful, they can be hard to work with. Neodymium magnets can pinch small fingers and attach to certain surfaces so strongly that they are difficult to remove. These are definitely more appropriate for older, stronger, more mature children.

1. Free exploration with magnets

Gather:

  • A few magnets of different shapes
  • Paper clips (made of different materials if available- plastic versus metal)
  • Coins
  • Pebbles
  • Metal washers
  • Steel nails (if age appropriate)
  • Small cars made of different materials
  • Chenille or pipe cleaners
  • Bowl of water or sink (optional)

Let the children free explore with magnets to test the materials provided, as well as any surfaces around the room or area. Try the walls, which may have metal support structures inside (especially around the windows).

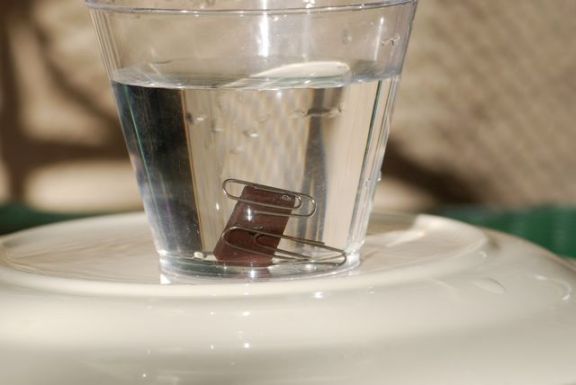
Once the children have found some waterproof items that are attracted to the magnet, like steel paper clips, add to the bowl of water or water in a sink. Ask if the magnets will work in water. If you use a clear plastic container, see if the magnets will work from the outside the container, too.

Find out what happens if you try to put two magnets together. Can you feel the “push” or “pull” of the magnets?

2. Magnets and sand play

Sand often contains bits of iron.

Cover a magnet with a plastic sandwich bag and tie shut with a sturdy piece of string. Leave enough string to allow the children to pull the magnet through the sand. Note:  You can do this without the bag, but the bag makes clean up much easier.

See the iron bits accumulate on the outside of the bag.

This is after only a few passes through a small amount of sand.

3. Magnets in space

Do magnets work in space? Check this video to see.

4. Magnetic fields

A classic experiment is to place a magnet under a piece of paper and sprinkle some iron powder on top. Our iron powder came in a science kit.

The idea is that the pieces of iron powder will arrange along the magnetic fields.

The results show that the fields are three dimensional.

It is fun to see the powder change shape as we moved the magnet around underneath. If you are careful, you can return the powder to its package to use again another day.

5. Compasses

One way to learn more about magnetism is to use a compass.

A compass is a small, lightweight magnet that pivots freely in a case. The magnet aligns with the Earth’s magnetic field and can be used to find direction.

25 Items for a Hands-On Physical Science Activity Box

Are you prepared for some hands-on science at home? Summer is a great time for informal science and now is the time to get ready.

From experience, I recommend that you gather items and put together a box for children to use to explore physical sciences whenever the mood strikes. The items you supply don’t have to be big or expensive. but if you have it on hand and gathered together, it won’t take a minute to get started.

Here are some tried-and-true suggestions that will be sure to ignite your child’s inner investigator. Have multiples of each item, and a set for each child you are working with. (Note:  These suggestions are for ages 3+ and always keep safety in mind.)

1. Paper and scissors – for paper airplanes, helicopters, bridges, drawing designs, recording data, etc., etc.

2. Plastic drinking straws to make into kazoos, atomizers, droppers, bridges, you name it

3. Paper towel tubes to make marble towers, airplanes

4. Manila file folders to make ramps, airplanes, etc.

5. Plastic garbage bags or cloth, bits of yarn or string, and action figures to make parachutes (parachute activity)

6. Wheels to make cars and/or toy cars to roll down ramps (inclined planes)

7. Marbles and small balls for marble towers, study what happens when two objects collide by playing marbles (relationships of mass and force)

8. Balloons to make cars, hover craft, drums, etc. (Suggestions for activities with balloons)

9. Magnets, a variety of kinds plus items to test, such as paper clips of different types, coins, the rocks below (Edit: magnet science activities)

10. Stop watch, watch with second hand, or other timing device

11. Flashlight – important tool for investigating shadows, light, how batteries work, etc.

12. Thermometer– alcohol or electronic/digital (for safety, do not use a mercury-based one)

13. Magnifying lenses to study surfaces of rocks, magnets

14. Prisms to investigate light (we got a very inexpensive crystal pendent that works to separate visible light into rainbows)

15. Aluminum foil – great for building boats or make a Leyden jar to study static electricity

16. Building blocks

17. Ruler – both for measuring and to use as a ramp (inclined plane), support, etc.

18. Toy boats to study buoyancy

19. Modeling clay to study floating and sinking, make fossils

20. Clean tin cans with all sharp edges removed (for tin can science)

21. Tape – all kinds, glue

22. Plastic soda or water bottles to make boats, cover with balloon and place in very warm water

23. Pencils, chop sticks, wooden skewers, dowels and/or craft sticks

24. Spools, pulleys

25. Some cool rocks or pebbles can become loads for cars and boats or be an introduction to geology

Pennies make good weights for the front of file-folder airplanes.

More advanced items to make or buy pre-made:

  • Inexpensive kites (often available in grocery stores for just a dollar or two), or balsa wood, string, tape and paper to make kites
  • Electrical circuit kits (may be available used or at discount stores that sell returned/discontinued items)
  • Inexpensive kitchen scale (garage sales) or materials to make a homemade scale
  • Plastic tubing (an aquarium supply) to learn about siphons, investigate propulsion
  • Make a trebuchet or catapult

If you have any other ideas for items to include for physical science activities, please let us know. Also, if you need further suggestions or instructions, my “engineer” and I would be glad to help.

Stay tuned for suggestions for a chemistry activity box and a biology activity box.

« Older posts Newer posts »